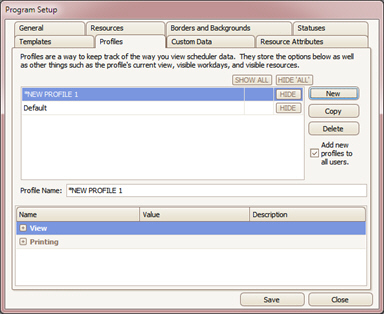
Note: Profiles may be set up or edited after the user becomes more familiar with EZClaim Scheduler.
Profiles ‘remember’ which resources are being viewed, along with the current calendar view and printing preferences.
1. To create additional ‘Profiles’, click on the ‘New’ button.
2. Enter a name for the new profile under ‘Profile Name’.
3.
To select the items for ‘View’, click on the  button next to ‘View’.
The expanded options for this Profile’s view are as follows:
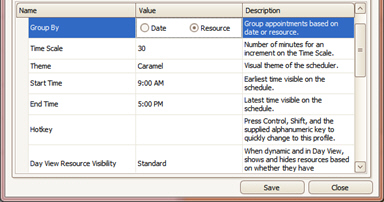
•Group By – Select to group appointments either by ‘Date’ or by ‘Resource’.
•Time Scale – This should be set to your most common appointment duration. If you normally schedule 15- minute appointments, enter 15.
•Theme – Using the drop down, select the overall visual Theme of the scheduler.
•Start Time – Set the ‘Start Time’ you would like to view on the schedule by clicking the up or the down arrow beside the Start Time.
•End Time – Set the ‘End Time’ you would like to view on the schedule by clicking the up or the down arrow beside the End Time.
•Hotkey – Assign a number or letter key to set as the ‘Hotkey’ for quickly changing to the selected Profile.
•Day View Resource Visibility – If set to dynamic and using ‘Day View’, the program will automatically hide the resources that do not have appointments. This helps when you have a large number of resources each of which work only part time. Prevents the need to change the resource visibility ongoingly.
•Classifications Shown – This option allows you to filter the patient list by classification. This is useful if you have multiple locations and don’t want patients from location A to be shown when using the location B profile.
•Appt Font Type – Select the ‘Appointment Font’ from the drop-down list.
•Appt Font Size – Select the ‘Appointment Size’ from the drop-down list.
•Hide Appointment Times – Shows or hides the appointment times on each appointment. Saves room if you have a large number of appointments.
•Hide Appointment Images – Shows or hides the appointment icons on each appointment. Saves room if you have a large number of appointments
•Hide Resource Navigator – Hide (or Don’t Hide) the resource scrollbar available at the bottom of the scheduler.

•Align Appointments – Check to align appointment borders with schedule cells.
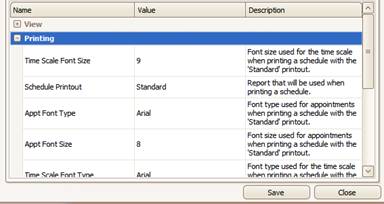
Click on button next to ‘Printing’
to select the Printing options for the specific profile.
•Time Scale Font Size – Select the Time Scale Font Size from the drop-down list of font sizes.
•Schedule Printout – Select the Schedule Printout options from the drop-down list. The available options are Standard and Appointment List.
•Appt Font Type – Select the Appointment Font Type from the drop-down list of font types.
•Appt Font Size – Select the Appointment Font Size from the drop-down list of font sizes.
•Time Scale Font Type – Select the Time Scale Font Type from the drop-down list of font types.
•Hide Appointment Times – Shows or hides the appointment times on each appointment. Saves room if you have a large number of appointments. Only works with the ‘Standard’ printout. Printout Orientation – Used when printing the daily schedule.
•Hide Appointment Images – Shows or hides the appointment icons on each appointment. Saves room if you have a large number of appointments. Only works with the ‘Standard’ printout.
•Printout Orientation – Used when printing the daily schedule.
•Minimum Time Scale - Used to set the minimum number of minutes the program will use for the Time Scale when displaying a ‘Standard’ schedule. Having a very small time scale may cause the scheduler to print on multiple pages.
Click on the ‘Save’ button to save your changes.
To copy and then edit the settings from an existing profile, click on the ‘Copy’ button. Rename Profile and edit any options.
A Profile may also be deleted. Highlight the profile to be deleted and then click on the ‘Delete’ button.