
These features are only available if the ‘Institutional Claims’ Add-On is activated.
See Institutional Claims Add-On for more information on activating.
Quick checklist for Institutional claim submitters:
1. Enter Institutional Activation Code in Libraries>Add-On Services. Code is provided by EZClaim.
2. Update Claim Type in Payer Library to ‘Institutional’ for applicable payer(s) only. Payer IDs may be different for Institutional vs Professional claims sent to the same payer. Please verify payer IDs with your clearinghouse as needed.
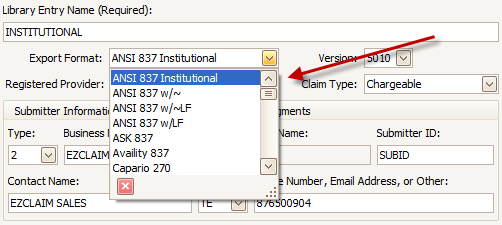
3. Set up Submitter/Receiver Library Institutional Entry using the 837I export format (screenshot below).
4. Activate ‘Institutional’ section of Claim grid (screenshot below).
5. Add ‘Revenue Code’ and ‘To Date’ on Service Line grid (screenshot below).
Important: Institutional grid layouts are user specific.
IMPORTANT:
Payer library setup is required before billing institutional claims. If you are registered with a payer as an institutional organization, select ‘Institutional’ as the Claim Type. This is how the program knows which claim form to print or which claims are available to export electronically. You may need two separate Payer Library entries if you will continue sending Professional claims as well.
Data Entry
Once the Add-On is enabled, additional custom columns are available on the claim screen. Add additional columns as needed to both the service line grid and the claim grid. For more information on customizing grids, see Grids.
Adding additional columns to the Service Line grid: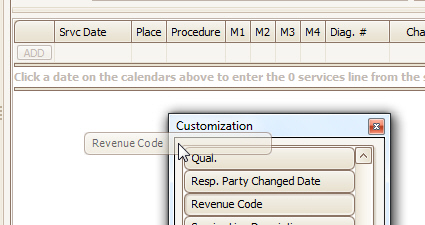
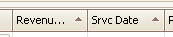
The service line grid is normally sorted by Srvc Date. For Institutional claims, the Revenue Code should be included in the sort. To change the grid sort, click the Revenue Code column header to sort, hold the shift key down, and then click the Srvc Date field to add it to the sort order. The column headings will show triangles to indicate they are both included in the sort.
Adding the Institutional Group to the Claim grid: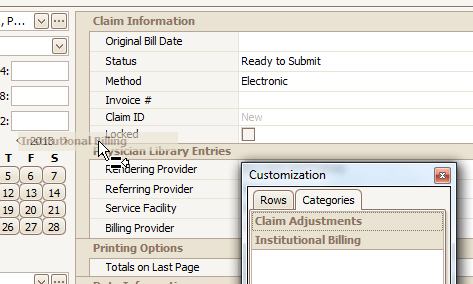
Adding additional columns to the Claim grid: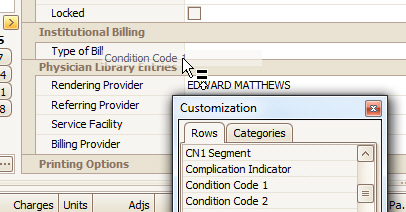
A new format is available in the Submitter/Receiver library. IMPORTANT: You must setup a library entry with the ANSI 837 Institutional Export Format to send claims in the 837I format.
The send claims screen will show professional or institutional claims depending on the Submitter/Receiver library selected.

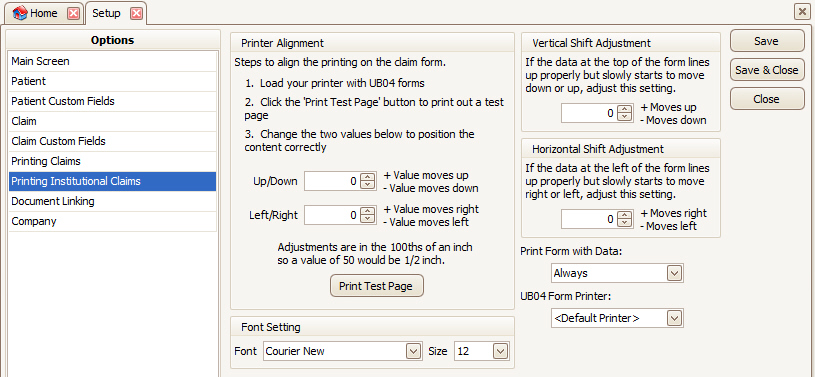
A new Program Setup options section is available for institutional claims. Click Tools > Program Setup then select Printing Institutional Claims to manage the options.
When opening the print claims window, a new filter option is available allowing you to print the institutional claim. The list will filter based on the type of claim.

SV2 02-1: This field (procedure code qualifier) is typically ‘HC’. A qualifier of ‘HP’ will be used if the procedure code matches the following characteristics: First character is ‘1’ through ‘5’, second character is ‘A’ through ‘E’ and third character is ‘F’ through ‘J’.
Many of the fields for the UB-04 form need to be added manually to the grids. See Grids for information on adding additional columns.
|
Field No. |
Field Name |
Screen > Field |
Notes |
|
1 |
Provider Name and Address |
Claim > Billing Provider |
|
|
2 |
Service Facility |
Claim > Service Facility |
|
|
3a |
Pat. Cntl # |
Claim > Claim ID (or Invoice #) |
Will use the Invoice # if available otherwise, the Claim ID. |
|
3b |
Med Rec # |
Patient > Account # |
|
|
4 |
Type of Bill |
Claim > Type of Bill |
|
|
5 |
Fed. Tax No. |
Claim > Billing Provider |
Billing Provider Tax ID number as entered into Phy library. |
|
|
Statement Covers Period |
|
Min and Max of date of services (earliest From date and the last To date) OR the values contained in the ‘Statement From Override’ and ‘Statement Through Override’ columns available as custom columns on the claim Grid. |
|
7 |
|
|
Not Available |
|
8a |
Patient’s Member ID |
Patient > Member ID |
|
|
8b |
Patient Name |
Patient > Name |
Patient Last First MI (no extra punctuation) |
|
9a |
Patient’s Address |
Patient > Address |
Patient’s address (not insured’s) |
|
9b |
Patient’s City |
Patient > City |
|
|
9c |
Patient’s State |
Patient > State |
|
|
9d |
Patient’s Zip |
Patient > Zip |
|
|
9e |
|
|
Not Available |
|
10 |
Date of Birth |
Patient > DOB |
|
|
11 |
Sex |
Patient > Sex |
M, F, or U for Unknown |
|
12 |
Admission Date |
Claim > Admitted Date |
|
|
13 |
Admission Hour |
Claim > Admission Hour |
|
|
14 |
Admission Type |
Claim > Admission Type |
|
|
Field No. |
Field Name |
Screen > Field |
Notes |
|
15 |
Admission Source |
Claim > Admission Source |
|
|
16 |
Discharge Hour (DHR) |
Claim > Discharge Hour |
|
|
17 |
Patient Status (STAT) |
Claim > Patient Status |
|
|
18-21 |
Condition Codes |
Claim Condition Code 1-4 |
Only 4 codes available |
|
22-28 |
Condition Codes |
|
Not Available |
|
29 |
Acdt State |
Claim > Auto Accident State |
|
|
30 |
|
|
Not Available |
|
31a thru 34a |
Occurrence Code Occurrence Date |
Claim > Occurrence Code 1-4 Claim > Occurrence Date 1-4 |
|
|
31b thru 34b |
Occurrence Code Occurrence Date |
Claim > Occurrence Code 5-8 Claim > Occurrence Date 5-8 |
|
|
35a |
Occurrence Span Code |
Claim > Occurrence Span Code 1 |
Only 1 span available |
|
35a |
Occurrence Span From-Through |
Claim > Occurrence Span From 1 Claim > Occurrence Span To 1 |
Only 1 span available |
|
35b and 36a-b |
Occurrence Span Code Occurrence Span From and Through Date |
|
Not Available |
|
38 |
Responsible Party Name and Address (Claim Addressee) |
Claim > Bill To |
Print the Bill To name and address. If the Bill To is ‘Patient’ then the patient’s address will print in this box. |
|
39a-41a |
Value Codes Amounts |
Claim > Value Code 1-12 Claim > Value Code Amount 1-12 |
12 value codes/amounts available |
|
39b-41d |
Value Codes and Amounts |
|
Not Available |
|
42 |
Revenue Code |
Claim > Revenue Code |
Available on each service line. Will print blank if left blank. The Total charges line will automatically contain 0001. |
|
43 |
Description |
Claim > Service Line Description |
Prints the service line description. Will print blank if left blank. No lookup is performed. |
|
44 |
HCPCS/RATE/HIPPS CODE |
Claim > Procedure |
Will print procedure code with up to 4 modifiers. All separated by a space. |
|
45 |
Service Date |
Claim > Srvc Date |
Lines sorted by revenue code then DOS |
|
46 |
Service Units |
Claim > Units |
|
|
Field No. |
Field Name |
Screen > Field |
Notes |
|
47 |
Total Charges |
Claim > Charges |
Will only be printed on the last page |
|
48 |
Non Covered Charges |
Claim > Non-Covered Charges |
Available in release 560 and higher |
|
Line 23 |
Creation Date |
Claim > Original Bill Date |
|
|
Line 23 |
Total Charges |
|
Calculated by the program. Total of all Charges |
|
Line 23 |
Total Non-Covered Charges |
|
Non-Available |
|
49 |
|
|
Not Available |
|
50 A, B,C |
Payer Name |
Claim > Bill To |
Up to 3 payers listed A – Primary B – Secondary C – Tertiary |
|
51 A, B, C |
Health Plan ID |
Claim > Bill To |
The ‘Payer ID’ from the payer library A – Primary B – Secondary C – Tertiary |
|
52 |
Release of Information |
Patient > Patient Signature on File |
Will print ‘Y’ if the Patient Signature on File is checked. Otherwise blank. |
|
53 |
Assignment of Benefits |
Patient > Insured Signature on File |
Will print ‘Y’ if the Insured Signature on File is checked. Otherwise blank. |
|
54 A,B,C |
Prior Payments |
|
Will show as long as the claim’s “Ignore Applied Amount” is not checked |
|
55 A,B,C |
Est Amt Due from Payer |
|
Not Available |
|
56 |
NPI |
Claim > Billing Provider |
Provider NPI from the physician library |
|
57 |
Other Provider ID |
Claim > Billing Provider |
Provider additional ID number (specific to payer). No qualifier is printed. |
|
58 |
Insured’s Name |
Claim > Bill To > Name |
Insured information |
|
59 |
P. Rel |
Claim > Bill To > Patient Rel to Insured |
Insured information |
|
60 |
Insured’s Unique ID |
Claim > Bill To > Insured’s ID # |
Insured |
|
61 |
Group Name |
Claim > Bill To > Insured’s ID # |
|
|
62 |
Insurance Group No |
Claim > Bill To > Group # |
|
|
63 |
Treatment Authorization Codes |
Claim > Prior Auth # |
|
|
64 |
Document Control Number |
Claim > Original Ref Number |
Original Ref Number from the claim screen. Will print in line A for primary claim, line B for secondary claim, and line C for Tertiary claim. |
|
66 |
Diagnosis and Procedure Code Qualifier (ICD Version Indicator) |
Claim > ICD Indictor |
9 for ICD-9 or 0 for ICD-10 |
|
67 |
DX: principal diagnosis code |
Claim Diagnosis A1 |
Diag A1 |
|
67 A-Q |
Other diagnosis codes and Present On Admission (POA) indicator |
Claim Diagnosis B2-L12 |
Diag B2-L12 |
|
Field No. |
Field Name |
Screen > Field |
Notes |
|
69 |
ADMIT DX |
Claim > Admitting Diagnosis |
|
|
70 a, b, c |
Patient Reason DX |
Claim > Patient Reason 1,2,3 |
|
|
71 |
PPS |
Claim > PPS Code |
|
|
72 |
External Cause Code - ECI |
|
Not available |
|
73 |
|
|
Not Available |
|
74 |
Principal Procedure Code and Date |
Claim > Principal Procedure Code and Date |
|
|
74a-e |
Other Procedure Code and Date |
Claim > Other Procedure Code and Date |
|
|
75 |
|
|
Not Available |
|
76 (NPI) |
Attending Physician NPI |
Claim > Attending |
Provider NPI from the physician library |
|
76 (QUAL and ID) |
Attending Additional ID Numbers |
Claim > Attending |
Provider additional ID number from the physician library |
|
76 (LAST and FIRST) |
Attending Physician Last and First Name |
Claim > Attending |
|
|
77 |
Operating Phy |
Claim > Operating Provider |
|
|
78-79 |
Referring Phy and/or Rendering Phy |
Claim > Referring Provider and/or Rendering Provider |
Will populate box 78 if only one provider is selected or 78 and 79 if two providers are selected. Rendering providers will have a qualifier of 82 and referring providers will have a qualifier of DN.
The rendering and referring provider will not print if their NPI is the same as the Attending. |
|
80 |
Remarks |
Claim > Remarks |
|
|
81CC a |
Code-Code Field |
Claim > Billing Provider |
Prints the billing provider’s Taxonomy code. The prefix is B3 and the code is printed in the second column |
Special Note on the POA indicator: The POA (Present on Admission) Indicator is a 25 character text value for potentially assigning POA indicators to each of the 25 diagnosis codes. the first character in the string will be the POA indicator for the first diagnosis, the second character, for the second diagnosis and so on. Because the program doesn't tend to preserve leading or trailing spaces, if the user wanted to NOT assign any POA indicator first the first diag, but assign one to the second, a special character (we picked *) is required to represent the blank. A value of "*Y" would result in a POA of Y in the second diag with nothing for the first.
 6
6