 Home tab >
Libraries > Authorization
Home tab >
Libraries > Authorization Home tab >
Libraries > Authorization
The Authorization Library allows you to track the numbers of units allowed and remaining for a procedure code. Please see Advanced Techniques for additional techniques.
•Authorization limit messages are shown only when new claims are entered. The program will not show authorization limit messages when changing data on existing claims.
•Units and Dollars Remaining are calculated using only service lines that fall within the authorization date range.
NOTE: Authorizations are generally assigned at the claim level – in other words, the same authorization number is associated with all service lines on the same claim. As of release 650, it is now possible to assign different authorizations to individual service lines if your payer requires you to do so.
At the Service Line level, an ‘Authorization Override’ field can be added to the grid via the Column Chooser.
At the Payer Library level, an ‘Export Authorization in Loop 2400’ checkbox is available. Do not check this box unless required by payer.
1. Click in the field ‘Click here to add a new authorized units library entry’ to open the fields for data entry.

2. Select Patient using drop-down arrow. Required.
3. Select Payer using drop-down arrow. Optional. ‘None’ is a valid option if you want the authorization to be available to any payer listed on the claim.
4. Continue entering Authorization information as needed.
Note: To customize column headings, right click on any column heading and select ‘Column Chooser’. Drag and Drop selection to heading. See Column Chooser for more information.
Tip: Right click an entry to open the patient record.
Rendering Phy – A Rendering Phy column can be added to the grid via the Column Chooser. When used, the authorization will only appear when the correct rendering provider is selected on the claim. Authorizations without a rendering provider will appear regardless of the claim’s rendering provider.
Wildcard - If there are multiple procedure codes within the same family of codes, you can use the wildcard character % at the end of the procedure code fragment. For example, entering 98% will count any procedure code that starts with 98.
Multiple Entries – If the same authorization number applies to different procedure codes, you can enter the same authorization number multiple times, once for each procedure code.
Modifiers – If your authorization is for both the procedure AND modifier, you can enter modifiers into the Mod 1 through Mod 4 columns. This will cause the program to count down authorizations only if the procedure code and modifiers match. If you leave the authorization modifier fields blank, the program will look at the procedure code only when calculating the units. Regardless of whether modifiers are entered on the service line, the units will still count down.
Product Code – If product codes are utilized during data entry, it may be necessary to enter the product code into the authorization library entry. The product code column is not typically visible and will need to be added via the Column Chooser. If a product code is entered, only the service lines that have that specific procedure/product code combination will be counted for units and dollars used.
Hide – Click the ‘Hide’ button if you want the data stored for archive purposes but no longer want it available for selection on claims. Click the ‘Show’ button to reverse this process. All authorizations remain visible in the Authorization Library.
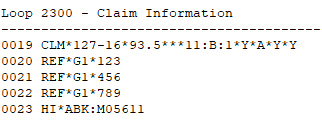
Multiple Claim Level Authorizations – Entering authorization numbers separated by commas (do NOT enter spaces) will result in multiple G1 segments in Loop 2300 of your ANSI file. Do not send multiple claim level authorizations unless required by payer!
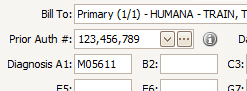
See the “How it Works” section above if your payer requires multiple authorizations at the service line (not claim) level.
IMPORTANT NOTE: Because Premier Scheduler tracks Visits only (not Units), EZClaim suggests tracking authorizations in either Scheduler or Billing – not both
The authorization library is designed to track units but has the added capability of tracking visits (counting dates of services) instead.
If you need to track visits (not units), use the following instructions:
1. Enter the authorization name and number.
2. Enter the word VISITS in the procedure code column.
3. Enter the number of visits allowed in the ‘Units Allowed’ column. NOTE: The Dollars Allowed column is ignored when tracking visits.
The program will now count down the remaining visits by counting the number of unique dates of service on all claims that use the authorization number.

Premier now has the capability of tracking authorizations without an authorization number.
This feature is useful for specialties like PT and OT whose authorizations are based on number of visits within a set timeframe but do not include an authorization number.
To use this feature, create an authorization as you normally would but enter the word BLANK (not case sensitive) in the Auth Number field. This allows Premier to count down authorization units for internal tracking purposes -- but the authorization number is not exported on electronic claims or printed on paper claims.
If you still want distinct authorization numbers in the library, enter any value in Auth Number but prefix it with BLANK to prevent it from exporting or printing.
This feature can be used with both Professional and Institutional claims.

The program can import authorization data in an ANSI 278 file. This is done by double clicking an ANSI 278 file in the ‘View EDI Reports’ window. The program will parse the ANSI 278 and show a preview window of the 278 contents.
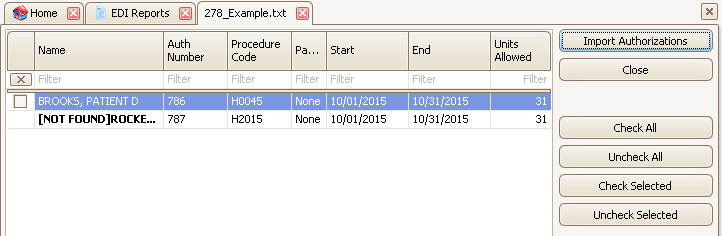
If the patient is not found, the program will highlight the record. Double click to link to an existing patient.
Check the rows to import then click the ‘Import Authorizations’ button.